Summer in Devon and Cornwall is glorious until your home turns into a greenhouse. Thick cob walls that hold winter warmth become heat traps in July, and the coastal humidity makes everything feel stickier than the temperature alone suggests. Many homeowners look up "DIY air conditioning" hoping to find a quick, cheap fix, only to discover that wall-mounted vs portable options involve refrigerant regulations, professional fitting costs, and waiting lists. The good news: safe, practical DIY cooling solutions do exist, and this guide walks you through every step of building one that actually works.
Table of Contents
- What to know before starting your DIY air conditioner
- Essential tools and materials for your DIY air conditioner
- Step-by-step: Building your own evaporative cooler
- Managing moisture and keeping your home safe
- Troubleshooting and expected results
- What most guides miss about DIY air conditioning in the South West
- When DIY isn't enough: Affordable professional solutions
- Frequently asked questions
Key Takeaways
| Point | Details |
|---|---|
| DIY is possible | Evaporative and airflow-based coolers are safe and realistic for most homeowners to try. |
| Moisture is critical | Managing indoor moisture prevents damp and mould risks when using DIY coolers in the South West. |
| Effectiveness varies | DIY cooling performance depends on your room's humidity, airflow design, and cooler build quality. |
| Know the limits | DIY solutions can help, but sometimes professional systems are the only way to achieve full home comfort. |
What to know before starting your DIY air conditioner
Having framed the need for affordable DIY air conditioning, it's essential to clarify what's realistically achievable for homeowners in Devon and Cornwall.
There are two genuinely safe DIY cooling routes available to most homeowners. The first is evaporative cooling, often called a swamp cooler, which passes warm air through a water-soaked medium so that evaporation drops the temperature. The second is staged airflow with humidity control, which uses fans positioned strategically to draw cooler external air through the home while pushing warm air out. Both can be built with basic tools and off-the-shelf parts.
What you cannot realistically do yourself is install a refrigerant-based split system. Refrigerant-based AC installs are regulated in the UK, requiring F-Gas certification to handle the refrigerant and qualified electrical work for the indoor unit. Attempting this yourself is illegal, potentially dangerous, and would void any insurance. This is not a technicality worth ignoring.
Devon and Cornwall present a specific challenge that most generic DIY guides overlook. The region's coastal humidity is considerably higher than, say, the Midlands or East Anglia. Evaporative cooling loses effectiveness as relative humidity rises, because saturated air cannot absorb more moisture. On a dry warm day in early June, a DIY evaporative cooler can perform well. During a muggy August heatwave with humidity above 70%, its impact shrinks noticeably. If you live close to the coast, you may find the air conditioning needs for Devon and Cornwall homes differ significantly from what you read on American or Australian DIY sites.
Important: Never combine DIY electrical wiring with water-based cooling systems unless you have formal electrical training. Stick to mechanical builds that use existing mains-powered fans in their designed configuration.
| DIY method | Best conditions | Typical cost | Humidity risk |
|---|---|---|---|
| Evaporative cooler | Dry, warm days | £20 to £60 | Medium to high |
| Staged airflow fans | Any warm weather | £15 to £40 | Low |
| Portable AC (bought) | Any warm weather | £150 to £400 | Low (removes humidity) |
For those curious about how modern air conditioning works in UK homes, the contrast with DIY methods is stark and worth understanding before you invest time in a build.
Essential tools and materials for your DIY air conditioner
Once you know which type of DIY cooling setup suits your home, the next step is gathering the right tools and materials.
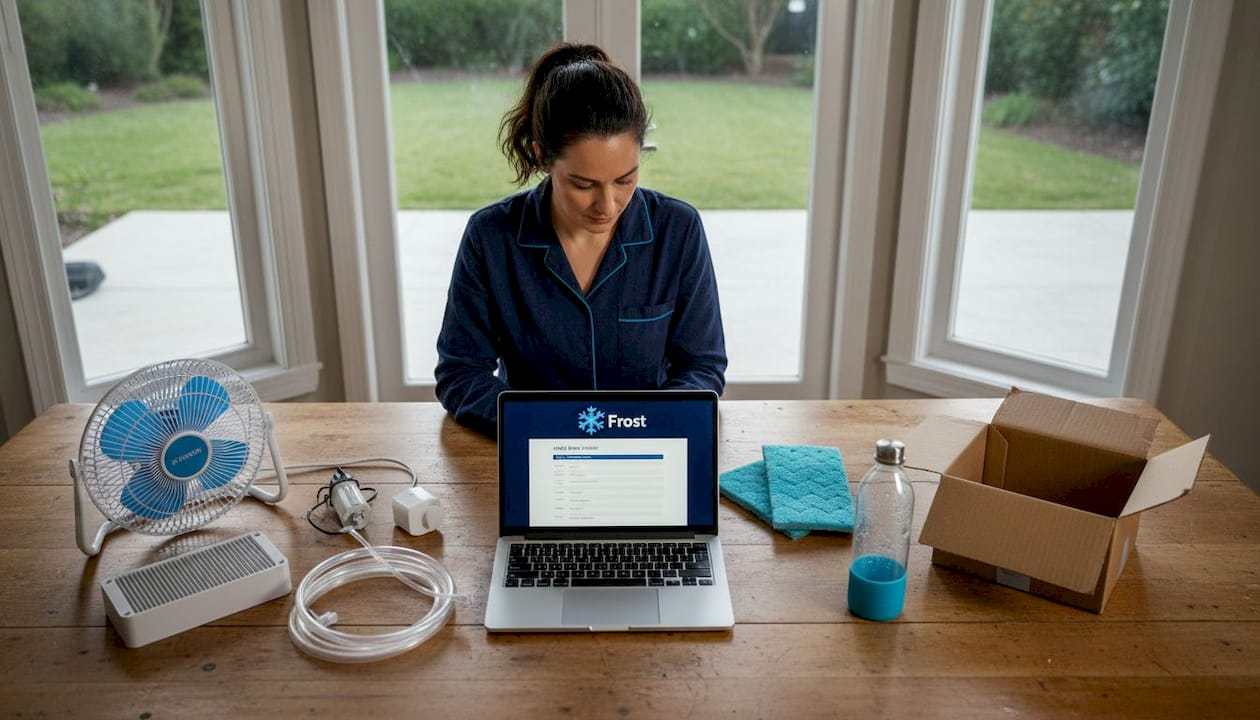
You do not need specialist equipment. Most builds rely on items you may already own or can pick up cheaply from a hardware shop or online marketplace. The key principle is that airflow path design and uniform wetting are the factors that separate a genuinely cooling unit from one that just blows damp air around.
For an evaporative cooler build, you will need:
- A box fan (20 to 30 cm diameter works well for a single room)
- A rigid plastic storage box or picnic cooler with a lid
- Evaporative cooling pads or a thick absorbent cloth (hessian works well)
- A small submersible pump (pond or aquarium pumps are ideal)
- Plastic tubing or irrigation pipe for water distribution
- A manifold or multi-outlet connector to distribute water evenly
- Waterproof tape and zip ties
- A drill with hole-saw attachments
- A separate RCD adaptor for electrical safety
For a staged airflow setup, you will need:
- Two or more box fans
- Window sealing foam tape
- A thermometer or simple humidity metre to monitor conditions
- Blackout curtains or reflective window film (optional but very effective)
| Item | Estimated cost | Where to find it |
|---|---|---|
| Box fan | £15 to £30 | Hardware shops, online |
| Aquarium pump | £8 to £15 | Pet shops, online |
| Evaporative pads | £5 to £12 | HVAC suppliers, online |
| Picnic cooler box | £10 to £25 | Supermarkets, outdoor shops |
| Irrigation tubing | £3 to £8 per metre | Garden centres |
| RCD adaptor | £8 to £15 | Hardware shops |
Pro Tip: Check Facebook Marketplace and Gumtree for secondhand box fans and cooler boxes. A £5 secondhand fan performs just as well as a new one in a cooler build, and you will often find multiple fans available locally in spring before the warm weather arrives.
The complete guide to home air conditioning covers more about how airflow principles apply to both DIY and professional setups, which is useful background reading before you start cutting holes in your cooler box.
Step-by-step: Building your own evaporative cooler
With materials assembled, you're ready to start building. Follow these steps for the most effective DIY cooler.
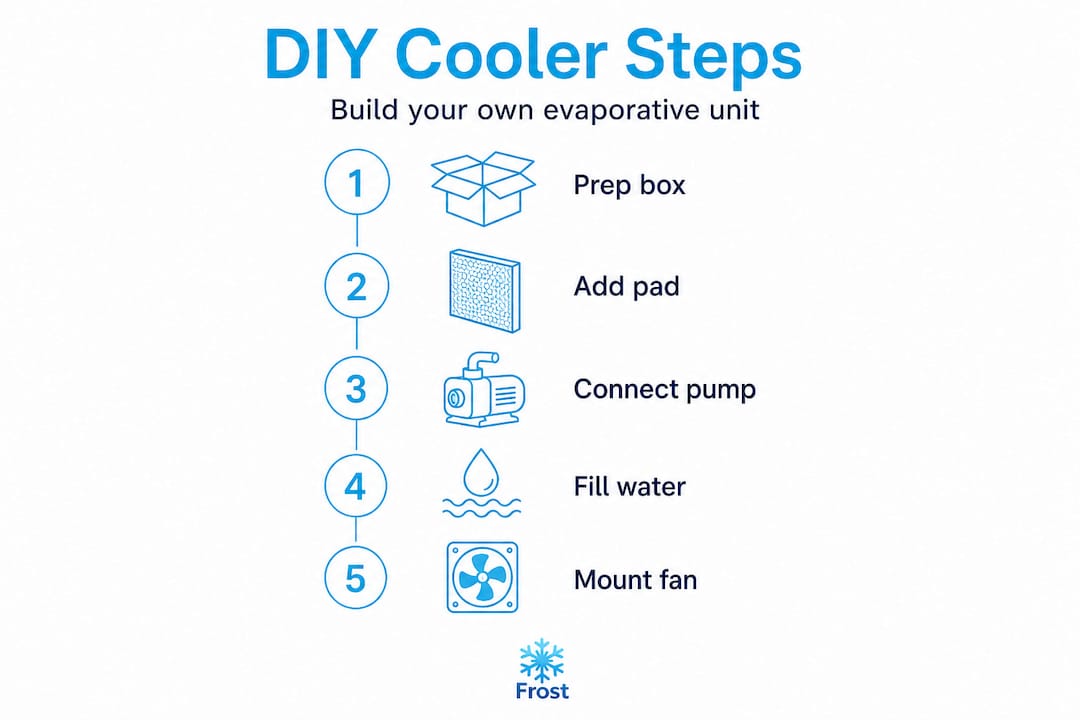
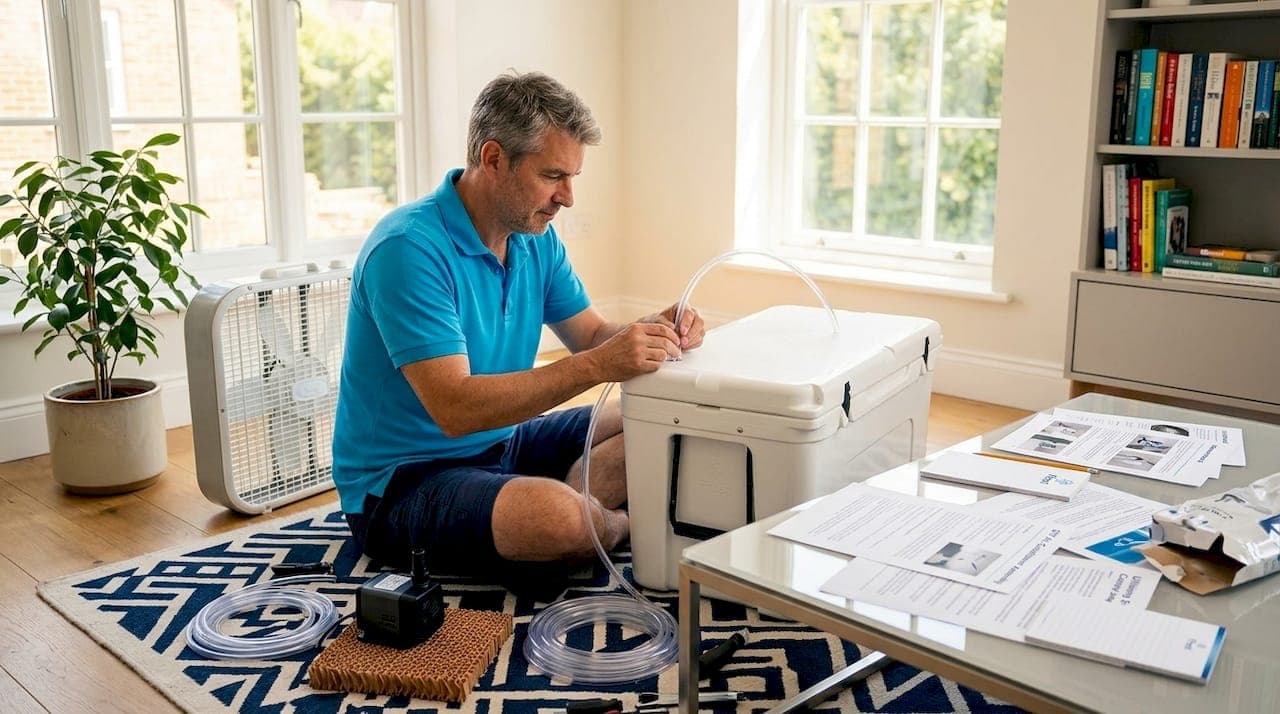
1. Prepare the cooler box. Cut a circular hole in the lid of the cooler box sized to fit your box fan snugly. This is the air intake. Cut a rectangular outlet hole on one side of the box, roughly the same total area as the fan opening, to allow cooled air to escape. Smooth any rough plastic edges with sandpaper.
2. Install the evaporative pad. Cut your evaporative pad or hessian fabric to fit across the inside of the outlet hole, leaving a gap of two to three centimetres around the edges. Attach it securely using waterproof adhesive or zip ties threaded through small holes. The pad must sit vertically so water can run down it evenly.
3. Set up water distribution. Connect your aquarium pump to the plastic tubing and route the tubing up to the top edge of the evaporative pad. Attach the manifold or create small pinhole outlets spaced five centimetres apart along the top of the pad. This ensures uniform water application across the full surface, which is the single biggest factor in cooling performance. Uneven wetting creates dry patches where no evaporation occurs.
4. Add water and test the pump. Fill the cooler box with cold water to roughly one third capacity. Place the pump in the bottom and run it before fitting the fan. Check that every part of the evaporative pad becomes visibly damp within 30 seconds. Adjust manifold holes if any areas stay dry.
5. Mount the fan. Place the box fan on top of the lid so it sits over the intake hole. Secure it with bungee cords or zip ties around the fan frame. The fan should draw air downward through the lid, across the wetted pad, and out through the side outlet.
6. Connect the electrics safely. Plug both the fan and the pump into a single RCD adaptor before connecting to the mains socket. This cuts power instantly if any water reaches the electrical components. Keep all cable connections away from the water reservoir inside the box.
7. Test and refine. Run the unit in the room for 20 minutes. Hold your hand 30 centimetres in front of the air outlet. You should feel noticeably cooler air compared to the room temperature. If the air feels damp but not cool, increase pad wetting. If it feels cool but too damp, reduce water flow slightly. Refer to the homeowner's guide to air conditioning for comparison benchmarks on what effective cooling should feel like versus what it looks like on a thermometer.
Safety first: Never operate your DIY cooler overnight while you sleep. Empty and dry the reservoir every two to three days to prevent bacterial growth in standing water. If you smell anything unusual from the unit, turn it off immediately and clean the pad.
Pro Tip: Position your cooler so the cool air outlet faces across the room rather than directly at where you sit. This creates a gentle circulation pattern that cools the whole space more evenly rather than just blasting one spot.
Managing moisture and keeping your home safe
After assembly, it's essential to use your new cooler safely and keep your home healthy in Devon and Cornwall's moist climate.
This is where many online guides fall short. They tell you how to build the cooler but not how to live with it safely. Moisture management is critical in Devon and Cornwall homes, where humidity is already elevated compared to much of England. Adding an evaporative cooler to a poorly ventilated room increases the moisture load significantly.
The risks are real and accumulate quietly. Evaporative cooling can create a damp microclimate that encourages mould on walls, window frames, and soft furnishings if you do not compensate with additional ventilation. In a well-ventilated room on a warm day with windows partially open, this risk is manageable. In a sealed room where you are trying to keep warm air out, moisture builds up rapidly.
Practical steps to manage moisture:
- Run a portable dehumidifier in the same room, particularly on days when outdoor humidity exceeds 65%
- Open windows on the shaded side of your home to encourage cross ventilation while the cooler runs
- Check walls and window frames for condensation after each session
- Limit cooler running time to two to four hours at a stretch rather than continuous operation
- Ventilate the room fully for at least 30 minutes after switching the cooler off
Signs that moisture is becoming a problem:
- Condensation forming on cold surfaces like windows or metal door frames
- A musty smell in the room after running the cooler
- Visible damp patches appearing on walls or ceilings within days of starting to use the unit
Stop and reassess: If you notice any of the above signs, stop using the evaporative cooler in that room and focus on improving ventilation first. Running a cooler in a damp room accelerates existing moisture problems rather than simply adding to them.
Understanding how to boost air conditioning energy efficiency at home also touches on humidity control, which is relevant context if you are trying to balance cooling performance with healthy air quality.
Troubleshooting and expected results
Even with careful setup, you may need to make adjustments. Here's how to track results and correct any issues.
Setting realistic expectations matters enormously here. A well-built DIY evaporative cooler can reduce perceived temperature by three to five degrees Celsius under good conditions. Cooling effectiveness depends directly on ambient temperature, relative humidity, and airflow design. On a humid Devon afternoon in August, you might get only one to two degrees of measurable drop, though the airflow itself adds comfort.
If your cooler is underperforming, check these common issues:
- Dry patches on the evaporative pad, which means uneven water distribution; adjust your manifold or add more outlet holes
- Water level too low in the reservoir; the pump may be drawing air rather than water
- Fan positioned incorrectly so warm room air bypasses the pad and goes straight to the outlet
- Room is too humid; switch to a staged airflow approach instead and run a dehumidifier
| DIY cooling method | Temperature drop potential | Best use case | Humidity impact |
|---|---|---|---|
| Evaporative cooler | 3 to 5°C in dry conditions | Inland Devon on warm dry days | Increases humidity |
| Staged cross-ventilation | 1 to 3°C | Any warm day with temperature difference | Neutral |
| Portable AC (bought unit) | 5 to 10°C | Any conditions | Reduces humidity |
| Blackout curtains alone | 1 to 2°C | South-facing rooms | None |
For more specific troubleshooting tips relevant to Devon and Cornwall, including problems that arise specifically in older or coastal properties, there is dedicated guidance available.
What most guides miss about DIY air conditioning in the South West
Here is the honest perspective that most DIY cooling articles avoid: evaporative cooling is a solution that was developed for hot, dry climates like the American Southwest, and much of the online content about it originates from those regions. When those guides travel to Devon and Cornwall, they bring assumptions that simply do not hold.
The practical reality is that during the hottest, most uncomfortable stretches of a South West summer, outdoor humidity is usually above the threshold where evaporative cooling performs well. The weeks when you most want relief are often the weeks when a DIY cooler will disappoint you most. This is not a reason to avoid building one entirely, but it is a reason to manage expectations honestly and experiment carefully rather than making it your sole cooling strategy.
The hidden cost that rarely appears in DIY cooling content is the potential repair bill that follows a season of poorly managed moisture. Mould remediation, repainting damp walls, and addressing condensation damage in an older Devon property can easily cost more than a professionally installed air conditioning system with pros and cons considered in full. This is the calculation most homeowners do not make before they start.
Our genuine recommendation: try the DIY approach, monitor your home carefully, and treat it as one tool in a wider comfort strategy. Keep a humidity metre running in the same room. If readings climb above 65% regularly during cooler operation, consider switching to cross-ventilation only on humid days. And if you find yourself rebuilding the unit every summer or dealing with persistent damp, the economics of a proper professional install start looking very different. A secondhand portable AC from a reputable brand often outperforms a DIY build in humid conditions and costs less than you might expect.
When DIY isn't enough: Affordable professional solutions
If you have worked through this guide and realised that your home needs more reliable cooling than a DIY build can deliver, you are not alone, and the solution may be more accessible than you think.

At Frost Air Conditioning, we work with homeowners across Devon and Cornwall who have exactly this experience. Our team is F-Gas certified, covers the whole of the South West, and offers same-day installs for many properties. We also offer 0% finance options to spread the cost, which makes a professionally fitted system genuinely competitive with repeated DIY attempts over several summers. A system installed correctly solves both the cooling and the moisture management problem in one go, rather than trading one for the other. Get in touch for a free quote and find out what a proper install would cost for your specific home.
Frequently asked questions
Is it legal to install my own air conditioner in the UK?
You can build or use evaporative coolers and fan-based systems freely, but refrigerant-based AC units require F-Gas certified professionals to handle the refrigerant, and this is a legal requirement rather than a suggestion.
Will a DIY evaporative cooler work in Devon and Cornwall?
Results vary considerably depending on the day. Evaporative cooling is strongly limited by humidity, so performance drops noticeably on the humid coastal days that are most common in the region during peak summer.
How can I prevent mould when using a DIY air cooler?
Open windows to encourage ventilation, run a dehumidifier alongside the cooler, and check walls for condensation regularly. Dehumidifiers and good ventilation are the most reliable combination for keeping moisture under control.
What's the difference between an evaporative cooler and a portable AC?
An evaporative cooler adds moisture to the air to create cooling, while portable refrigerant ACs require venting and actively remove humidity as well as heat, making them far more effective in humid British conditions.
How much cooling can I expect from a DIY air conditioner?
Under good low-humidity conditions, a well-built evaporative cooler can drop perceived room temperature by three to five degrees. Cooling effectiveness is limited by ambient humidity and airflow design, meaning results on muggy Devon days will be more modest.